Showing posts with label frugal baking. Show all posts

Friday, August 8, 2025

My go-to cake recipe

Friday is the most important day for us, so I always like to make the day a bit more special. One of the ways I do that is by food- making our main meal a bit more elaborate, or just making one of my family's favourite food. Another thing is baking. I like baking something specifically on Fridays, and it's become a bit like a family tradition at this point. It doesn't really need to be very fancy, but just baking something like a cake or cookies is highly appreciated. 

Our favourite cake is what I regularly make. It's a simple recipe and doesn't really need kitchen equipment. I've been using this recipe for well over a decade and I don't even know anymore where I got the recipe from, really. And I don't really have a recipe written down because it's all in my head πŸ˜† but that's about to change! I thought to share it here with my readers. 

For one round cake pan (I think it's ΓΈ28 cm, but you can also use a rectangle shape or even casserole pan, etc), you'll need: 


1 cup of granulated sugar

4 medium sized eggs, or 3 large eggs 

1 cup of neutral oil (canola, corn, soy, peanut... just anything that would fall under vegetable oil I guess) 

1 cup of milk 

1.5 tablespoons of my "homemade" vanilla sugar but you can use regular vanilla sugar or vanilla extract (for us it needs to be alcohol free so we don't use extract)

2 cups of all purpose flour (scooped, not spooned) + 1.5 tablespoons of baking powder 


Mix the sugar and eggs using a whisk. They don't have to be very fluffy or pale, just whisking for a minute or so is enough. Then add the oil, wisk again. Then the milk and vanilla sugar. Then scoop two cups of plain all purpose flour and measure 1.5 tablespoons of baking powder. I use a small sieve for the baking powder as it tends to have clumps sometimes, it makes it easier to devide it evenly in the batter. 

Whisk very well and mix until there are no more clumps visible. Now your cake batter is ready! 

I bake it at 180° c (360 °f) for one hour. I must add that my oven doesn't heat up like other ovens do, so 150° c (310 ° f) would come closer to the real temperature needed for this cake. 

Let it cool down before slicing, then enjoy with a nice cup of coffee or tea 🍡 


Wednesday, July 30, 2025

Leftover cookie dough breakfast cake

Yesterday I was in for some baking. I made chocolate chip cookies, our favourite kind of cookies at the moment. We usually have one temporarily kind of favourite cookie and then move on to the next πŸ˜‚

Anyway, I made quite a big batch, but not all the cookies fit on the two cookie sheets that I used. I didn't want to use yet another cookie sheet just for about half the space they would take on the cookie sheet, not to mention leaving the oven on for just a few cookies. But I certainly didn't want to waste the dough either. I read you can freeze cookie dough but I was in the mood for baking anyway so I thought I'd bake something different with the cookie dough as a base. This kind of baking is what I do a lot and the result is usually a surprise. But what's most surprising is that those spontaneous bakes never disappoint. I always need to be quick to write them down or I just forget all I've used, and I end up never imitating them as good as the first time! 

                                       The cookie dough


So here is my breakfast cake recipe, using leftover cookie dough. I was hesitant to call it a cake because it's more like baked oatmeal and not very sweet, but there we go: 

Around 2 cups of chocolate chip cookie dough (I used chocolate chunks instead, as chocolate chips are nearly impossible to find here) 

2 eggs 

Half a cup of peanut butter 

A few tablespoons of milk (optional)

A teaspoon of baking powder 

1.5 cups of oats 

1/3 cup of desiccated coconut 

A pinch of cinnamon 


Crack the eggs over the dough, add in peanut butter and stirr well. Add all the other ingredients. It should have the consistency of a thick batter. I added a bit of milk because my batter was too thick, but if yours isn't there is no milk needed. I didn't use a lot of add-ins because there were chocolate chunks already, but if you like you could add raisins, fresh fruit, dates, or even more chocolate. 

I poured the mixture in a round cake pan and baked it for 45 minutes, 180°c (360° f). I let it cool off completely before I devided the baked oatmeal into 10 pieces. Had one for breakfast and the rest of my family want to try one tomorrow for breakfast, the rest I'll be freezing for a quick and convenient breakfast. 

Try at your own risk πŸ˜‰


The baked oatmeal ready to go into the oven 


Straight out of the oven. Unfortunately I can't posts smells


                                                 Plated up


Friday, July 25, 2025

Tunisian kesra bread


I believe that everyone should be able to make homemade bread. Not necessarily difficult artisan bakery style bread; just a simple recipe will do. Baking bread, in my opinion, is an essential life skill or at least something that can come in very handy.

Today I'm sharing my kesra recipe. Kesra is a Tunisian bread that's made on the hob and very delicious. It's also known by other names in some countries, such as tachnift or batbout in Morocco. 
I learned how to make it many years ago from my mother in law and my sister in law, and tweaked it a little bit to suit our taste, but other than that it's the same as theirs. And my mother in law, on her turn, also learned it from her mother- so I'm proudly sharing a real family recipe here! 

For 6 medium sized round breads, you'll need: 

9 cups of fine semolina flour 
2 heaped spoons of instant yeast 
2 teaspoons of salt, or more depending on your quality of salt 
5 cups of warm water (could be more depending on the quality of the flour) 
Oil to grease your bowl 
Some seeds, such as sesame or nigella seeds (optional) 

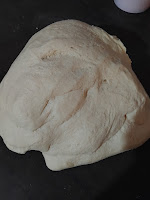
Start by mixing the dry ingredients in a big bowl. Add the water until you're able to make a dough that isn't sticky. 
Knead for 10 minutes. Ideally more, but I've found 10 minutes of kneading to be sufficient. 
It should look like this: 


Then devide it into 6 equal pieces. I don't have a dough scraper or other special equipment, so I just use a good old knife. 


Then I formed nice round balls from the dough, rubbed it with a bit of oil and devided it in two bowls: 


I covered both bowls with big round trays, as I try to avoid disposable plastic as much as possible, but you could also use plastic wrap. Or don't grease it and cover with a clean dish towel. Now let it sit and rise until it's at least doubled in size. The bigger the better, so don't do this when you're in a rush! Since my kitchen is very warm during the summer, it didn't take long. 

It's good when it looks like this: 


(Now compare it to the picture with the two small balls of dough in it...) 

Get the dough out, punch the air out and make two balls again. Now heat your pan on the hob. I have two cast iron pans that are purposely used for baking breads, but you can use a "regular" cast iron pan or just a regular frying pan. Just whatever you have will probably work, although I would recommend cast iron (some people here even bake their kesra in clay pans, especially in the villages)

Make sure there's enough room on your counter and that it's clean. 


I always thoroughly clean my counter after making dough πŸ™‚

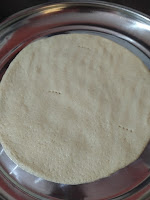
If your pan is ready (it shouldn't be really really hot!), you can start to form your bread. Just gently push it down in a rotating way so you end up with a nice round bread. Prick a few times in the dough with a fork.


Now you can transfer it into the pan. I usually fold my bread and then when it's the pan immediately turn back the piece of dough that was folded over, to make picking up the dough a bit easier. 

When it's starting to bubble, it's probably time to turn around the bread. I used a spatula for this.


Then bake the other side as well. 


Then, and this is optional, when the other side has browned enough, it's time to bake the sides. Some people prefer the sides to be more on the dough side but we like them a bit more cooked. 


It's a bit of a blurry picture lol. This was the best picture I could take with using just one hand. Just turn the bread little by little until the whole side has a nice golden brown colour too. 

Now bake all your breads like this. I use two pans at the same time so it's a bit faster, but one pan definitely works fine too. Pile them up on a tray/plate with some towels (I use old t-shirts) and try to let them cool off completely...which is probably the most difficult part! 

Wednesday, October 2, 2024

Apple sheet cake

We had a bunch of apples that were gifted to us and that no one really wanted to eat as is, because they were soft and had spots. There were quite a few, and since I didn't want to waste them, I decided it was best to make a treat out of them. Was in the mood for baking anyway, and this way we didn't have to waste the apples. We love apple pie, but I figured that the apples we had that I wanted to use weren't quite enough for that- plus, butter is so expensive here. So I opted for a cheaper treat, an apple sheet cake with crumble topping. The recipe I kind of made up myself - I know, I know, some people say that baking is all about precision, but somehow, my inventions never really seem to fail! So I decided to take the risk. And I'm glad I did take the risk because everyone loved it. The thing is though, with these kind of baking recipes, I hardly ever remember how I exactly made them. So when I make them a next time they might come out quite differently πŸ₯² Which is why I immediately wrote down the approximate quantities so I could make this exact cake again. 

For the dough, I used: 

1 3/4 cups oatmeal 

1 cup ground oatmeal 

2.5 cups white flour 

4 teaspoons baking powder 

1 cup of sugar 

2 teaspoons cinnamon 

2 eggs 

1.5 cup butter, melted (I used margarine 🀫)


Combine all the dry ingredients and then mix in the liquid ingredients. If it's a bit too dry, add some liquid, either milk or water. If it's too sticky, add some more flour or oatmeal. Now spread out the dough in the pan of your choice - I used a rectangular one which is used to make lasagna etc. Not sure what the exact measurements are. I didn't use all of the dough, around 1/4 or 1/5 was left, which I used for the crumble topping. 

Then peel, core and slice around 5-6 big apples, divide these slices over the dough. 

Now make your crumble topping. If you're like me and you've got a bit of cookie dough left over, then divide that into smaller chunks, so that it will mix easier into the crumbs mixture. Melt another half a cup of butter - or a bit more. Then add half a cup of sugar, half a cup of white flour and half a cup of oats. Mix this with the tops of your fingers until a crumbly consistency forms. If it's not yet crumbly, add some more flour, or oats, or both. If it's too dry add some butter - doesn't have to be melted, soft butter will do, too. Then spread this as evenly as possible on the apple slices. 

I baked this for about one hour on 180° c, which is 356° f. 


Some notes: 

This is a very adaptable recipe. You can add anything you'd like to add more flavour; raisins or other dried fruits, nuts, etc. We don't like raisins in sweet baked goods so I left them out. Or just use different fruits altogether. 

I call this a sheet cake which is the literal translation of what we call 'plaatkoek' in Dutch. A plaatkoek is a bit in between a large cookie and a cake, so don't expect it to be very fluffy. 

This can be freezable, although it certainly wasn't enough for all of us to have that much leftovers 🀭

Use whatever flour you'd like - I just used what I had on hand. However, I wouldn't leave out the oats, as they give this cake so much flavour and a nice texture. 


Friday, August 2, 2024

A kitchen without an oven

One thing in particular has caught my attention when it comes to being frugal with utilities, and cooking in general. And that is that we don't use our oven a lot. It seems like for most people, an oven is a kitchen essential, and they'd be lost without one. The other I saw someone on a Facebook group asking what other people make if they have no oven. This was supposed to be a frugal living group, so I assumed that most of the people there were like me and used their oven occasionally. But I was wrong, and most people's responses were that they absolutely didn't know what to do without one. 

That made me thinking of my use of the oven and what I do differently from others. First of all, the frequency. Last week, I used the oven twice- once for making a cake, and once to make baked chicken. I usually bake chicken on the hob, but I sometimes like the convenience of not having to flip the chicken every 10 minutes or so since I had other things to do. The cake was a big one, and I froze about half. That's not only healthier (if I wouldn't freeze it right away we'd surely be tempted to finish it anyway), it's also more frugal - less electricity used, as well as saving money on the baking ingredients. This week, I made some cookies and muffins. However, there are also weeks that we don't use the oven at all.  So I'd say, on average it's being used once a week. Another thing is that we don't eat casseroles as much. We rarely do, in fact. I like to make lasagna on special occasions- all of the ingredients are quite expensive, and it's a time consuming meal to make when you make about everything from scratch. Every so often, I make Tunisian tajine (which is like a crustless quiche), and makarouna bechamel, also known as "Arabic mac 'n cheese". But for the most part, we don't do a lot of other casseroles. Probably partly due to the fact that casseroles are considered cold weather meals (in our family, anyway), and around these parts, the cold weather doesn't last that long. For most of the year, it's nice warm weather or unbearable hot. And while I don't mind eating hot foods during the summer, for some reason, casseroles are a bit different. They're just too "heavy", and usually containing dairy of some sort which makes a meal more expensive. Casseroles aren't really a thing in Tunisian cooking anyway, and while I do make dishes from other cuisines from time to time, it's Tunisian foods that are our go to meals. Pizzas are a rare occasion here too, and a rare treat. Bread is either purchased at the nearby bakery or if it's homemade, it's usually stove top flatbread. 

All in all, I think that an oven isn't really an absolute necessity, although it's a nice extra. I've had people asking me what in the world we have for dinner if we don't use our oven regularly. Well, just that: soups, pasta dishes, potatoes, rice dishes, couscous, stews, and I think I can go on and on. I, on the other hand,wonder what they do serve for dinner if they can't function without an oven! My husband was raised in an oven-free household for the most part; my MIL didn't have one until he moved out of the house. And now she doesn't really use the oven anymore and is just used as a storage space. My MIL did have a "wonder pan", a pan you use on the hob and functions as an alternative for an oven. She used this when making cake, among other things. For cookies, the communal oven (which I wrote a post about earlier) was used. She didn't really make casseroles and when baking bread she used the tabouna (outdoor oven, which is comparable to an Indian tandoor). This bread tasted absolutely amazing. 

Here's some other ways we save on electricity when it comes to the oven, other than just not using it very frequently: we have a toaster oven, albeit a relatively large one, but still smaller than most average ovens. This takes less electricity. When we do bake, we tend to do a "baking marathon", as preheating the oven does take more electricity. So we might make muffins and right after that, cookies or bread for example. This is actually quite an old fashioned thing to save on utilities- most women did a baking day once a week. Also, I might be a bit stubborn but I go against some conventional "rules" when it comes to baking. I rarely adjust temperature, for example, and our oven is set at 200° c (which in reality is more like 180° c - talking about stubbornness, ovens kind of do have their own characters I guess πŸ˜„). I also don't really preheat, which is an advantage of having a separate/toaster oven, as they heat up much quicker. I turn off the oven before it's "officially" ready, and make use of the residue heat. Yes, I do this when baking cakes too. I must say that I usually stick to the easier recipes, so I'm not sure how that would work out with more complicated recipes. 

Anyway, those were some insights on the use of ovens. I could definitely live without one, although it's a nice extra to me. But a necessity it is not (in my opinion, anyhow). 

Wednesday, April 3, 2024

Vanilla sugar

One thing us frugal people are really good at, is making things stretch and dilluting. And I don't mean just adding some water to a nearly empty washing up liquid bottle, but even the less obvious things that necessitate a bit more of thinking outside the box. Yesterday I was "making vanilla sugar" as my youngest daughter called it - essentially, it was just "dilluting" vanilla sugar with regular sugar, with a 1:1 ratio. And then it has to sit for some time in a closed jar, preferably at least two weeks, in order to get as strong as undiluted vanilla sugar. 

Why do I bother to do that? Well, vanilla sugar is quite expensive here- it's literally ten times the price of regular sugar. You don't really notice it when you buy a small package, but eventually small costs add up. That's why I usually look at the price per KG (they don't always display the price per KG here, so I just calculate it myself). It truly makes a big difference. There's also the issue of packaging. Vanilla sugar comes in tiny sachets of 8 gram each, and is being sold per 5 sachets which is packed again in plastic. Eek! I really don't like all that plastic. In fact, I hate it. So when I can avoid wasting a bit less disposable plastic, I'm happy to do so. And of course, vanilla sugar isn't that healthy, I'm totally aware of that. Now I'm not even talking about the sugar (which is obvious), but the chemicals as well. I'd love to switch to real vanilla beans, which I used in the Netherlands but can't find here. Even if it were available it would probably be way too expensive. And vanilla extract is a no no for us because it's alcoholic. So, until I find a better solution, vanilla sugar it is. And I use quite a lot in my baking. So I guess for all the aforementioned reasons, diluting my vanilla sugar with plain white sugar is the next best thing to do- less chemicals, less money and less plastic waste. 

Make It Yourself Monday: homemade seitan

As I mentioned previously, I wanted to do a post about making your own seitan. I really don't know why it took so long to post it, or ev...